Probot Apps with a UI
•
We've seen a lot of fantastic Probot Apps pop up that have helped people automate all the things, but there's a whole feature-set that many apps aren't taking advantage of.
Let's take a look at some features of Probot by digging into the codebase, and explore how to bring interactivity to your Probot App.
Probot as an Express server
#Something that is often overlooked is that Probot, at its core, is an Express server with a fancy POST endpoint for handling webhook payloads:
// https://github.com/probot/probot/blob/HEAD/src/server.ts
export const createServer = (args: ServerArgs) => {
  const app: express.Application = express()

  app.use(logRequest({ logger: args.logger }))
  app.use('/probot/static/', express.static(path.join(__dirname, '..', 'static')))
  app.use(args.webhook)
  app.set('view engine', 'hbs')
  app.set('views', path.join(__dirname, '..', 'views'))
  app.get('/ping', (req, res) => res.end('PONG'))

  return app
}
The above snippet is taken from Probot's codebase, and illustrates the internals.
app.use('/probot/static/', express.static(path.join(__dirname, '..', 'static')))
app.use(args.webhook)
app.set('view engine', 'hbs')
Here we're effectively registering the webhook router as a regular old middleware (an instance of @octokit/webhooks).
This is important because wherever we are in our Probot app, we can access and use the internal Express server.
app.route()
#This method is a great way to grab the Express server and start doing stuff with it. You can add middleware, routes - it really is a regular Express server! The one "gotcha" is that Probot's internal routes are registered before your app's code is run, so middleware won't apply retroactively.
module.exports = app => {
  const server = app.route()
  server.get('/example', (_, res) => res.send('Yay!'))
}
You can now make use of Probot's authentication functionality outside of the webhook handler. Let's create a GET route that will respond with the app's identity - we'll use an Octokit client that's authenticated as the app:
module.exports = app => {
  const server = app.route()
  server.get('/whoami', async (req, res) => {
    const octokit = await app.auth()
    const { data } = await octokit.apps.getAuthenticated()
    res.json(data)
  })
}
Pretty rad - we've accessed data in our Probot App that is in no way tied to a webhook payload. This is a key part of building apps that don't just respond to events, but truly integrate with GitHub.
Identifying users
#A little known part of GitHub Apps (and by extension, Probot) is that users can "log in" using the regular OAuth flow. Your GitHub App has some credentials (a client ID and secret) that can be used to ask GitHub who the user is:
First, we expose a /login route where we redirect the user to GitHub with some special query params:
server.get('/login', async (req, res) => {
  // GitHub needs us to tell it where to redirect users after they've authenticated
  const protocol = req.headers['x-forwarded-proto'] || req.protocol
  const host = req.headers['x-forwarded-host'] || req.get('host')

  const params = querystring.stringify({
    client_id: process.env.CLIENT_ID,
    redirect_uri: `${protocol}://${host}${opts.callbackURL}`
  })

  const url = `https://github.com/login/oauth/authorize?${params}`
  res.redirect(url)
})
After the user goes to GitHub, they'll be presented with an Authorize screen. They'll decide to authorize, which will send them back to your app's Callback URL. We'll define this as /login/cb, but you'll also need to set it in your GitHub App:
server.get('/login/cb', async (req, res) => {
  // Exchange our "code" and credentials for a real token
  const tokenRes = await request.post({
    url: 'https://github.com/login/oauth/access_token',
    // Use our app's OAuth credentials and the code that GitHub gave us
    form: { client_id, client_secret, code: req.query.code }
  })

  // Authenticate our Octokit client with the new token
  const token = tokenRes.body.access_token
  const octokit = new GitHubAPI()
  octokit.authenticate({ type: 'token', token })

  // Get the currently authenticated user
  const user = await octokit.users.getAuthenticated()
  console.log(user.data.login) // <-- This is what we want!

  // Redirect after login
  res.redirect('/')
})
Nothing above looks like your average Probot code, but it can be paired with a regular old Probot App. By allowing users to log in to the browser, there's a whole world of possibilities.
Existing Probot Apps with UIs
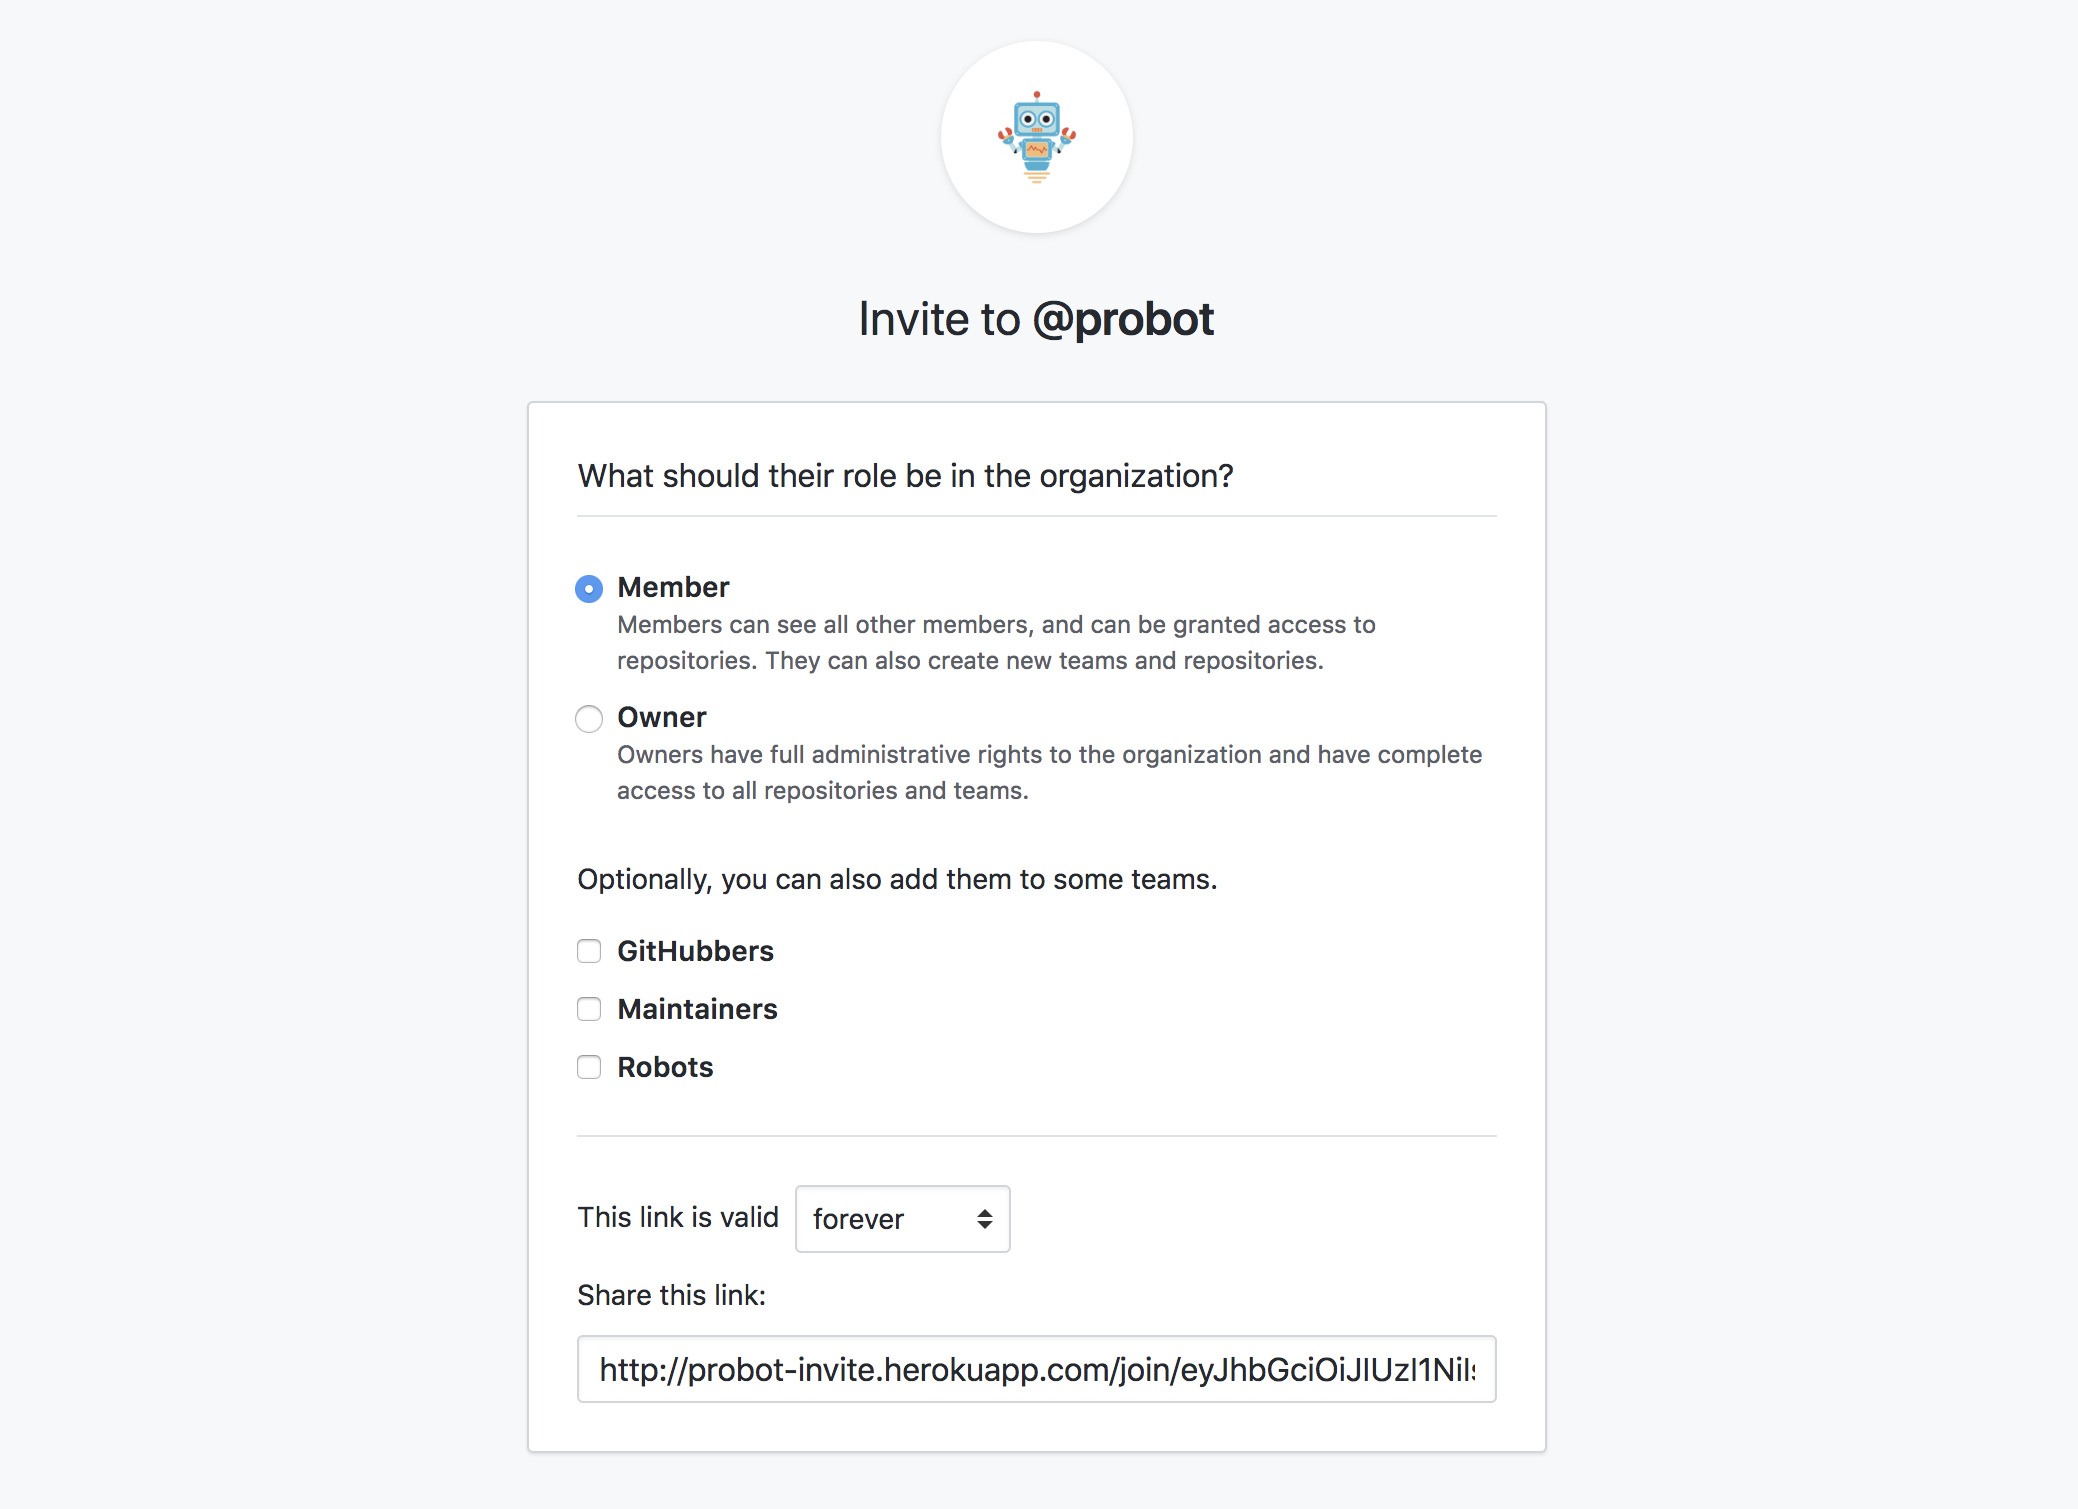
#probot/invite
#A great example is probot-invite. Once the app is installed in an organization, admins of that org can visit the app in the browser and generate a link to invite other users to that organization:
GitHub Learning Lab
#This is the project I work on at GitHub. It's a weird combination of Probot, the GitHub API and YAML (it's fascinating I promise). In Learning Lab, we make a ton of different requests; sometimes on behalf of the user and other times on behalf of the app itself, as a sort of third-party actor.

The above screenshot represents a simple example of a course on Learning Lab - when the internal Probot instance receives a webhook event for a closed issue, it'll update the page to check off that step. The UI for this lives on https://lab.github.com - totally separate from GitHub itself.
If you want to learn more about how Learning Lab works, you can watch this talk - I go into the nitty gritty of it!
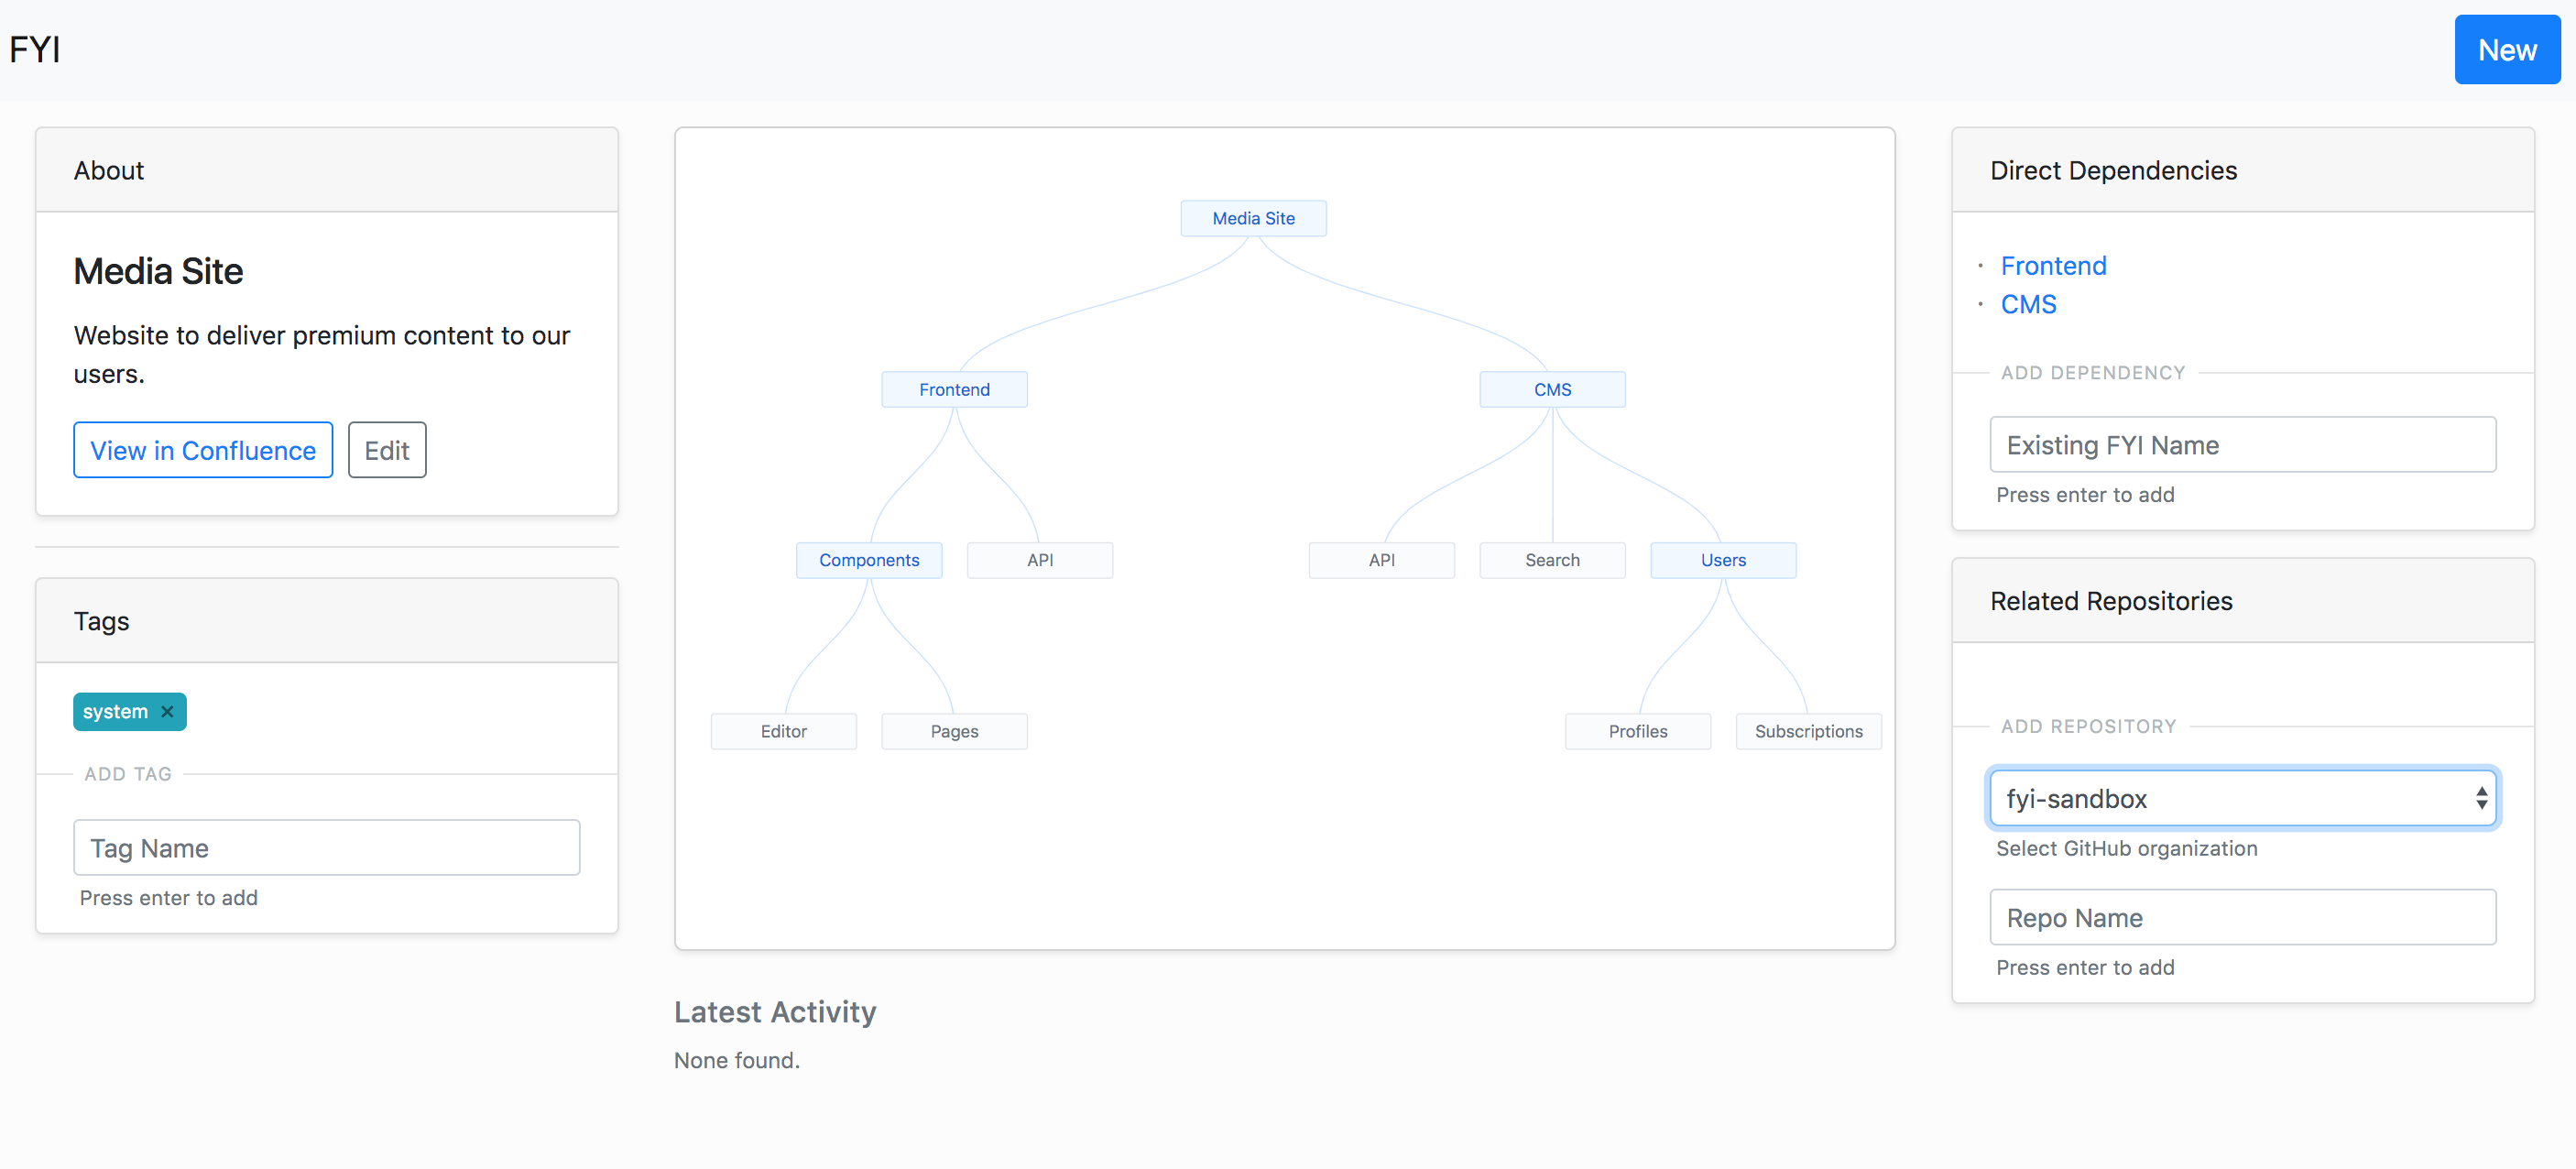
CondeNast/fyi
#Folks in the Probot community have built a really amazing app that ties together repositories in their company. From the README of the repository:
The FYI application was built... to stay on top of their growing technology portfolio of systems (sites, apps, apis) distributed across hundreds of repositories in multiple GitHub organizations.
Now you should have the information you need to build a Probot app that both listens to webhooks and exposes a UI for users to interact with. You can still take it further, by using the access_token to make user-to-server requests on behalf of the user, opening up new possibilities for fetching data that is scoped to the user.
Let's build one!
#Here's a realistic example of where we'd want to use this functionality. Let's imagine a data-tracking integration, where we want to store metrics of commit activity in our GitHub repository. This is just a thought experiment - we won't go too deep into building this for real, though you certainly could!
We want to store more detailed information than what the GitHub API provides up front, like the size of each commit or how many times a certain file was changed - so we listen for the push event and store that data in our database.
app.on('push', async context => {
  // A function to get more details about the payload by asking GitHub
  const details = await getDetailsFromPayload(context, context.payload)
  return db.Record.create(context.repo({ payload_id: context.payload.id, details }))
})
But now that we have this information, we need to show it somewhere! GitHub doesn't currently have really extensible ways to share things into the UI, so we'll build our own 🎨
First, we'll need to create some routes:
const server = app.route()
// A little middleware that will redirect the user
// to the `/login` if they are not already logged in
server.use(forceLogin)
server.get('/:owner/:repo', async (req, res) => {
  const { owner, repo } = req.params
  // Check that the user has access to this repo
  if (await userHasAccess(req.session.token, owner, repo))
  // Get some data from the database
  const data = await db.Record.findAll({ where: { owner, repo } })
  // Respond with some JSON data
  return res.json(data)
})
Managing user sessions
#When used with a library like cookie-session, your app can persist user sessions - so users visiting your site will stay logged in.
// Get the currently authenticated user
const { data } = await octokit.users.getAuthenticated()
req.session.user = data
req.session.token = access_token
Determining user access
#We don't want users to see data for repositories they don't have access to. We need to ask GitHub if the user in question can see the repo - we can accomplish this in a couple of different ways. One method is to try requesting the details of the repo as the user - if it throws a 404 error, it means the user can't see the repo:
async function userHasAccess (token, owner, repo) {
  // Authenticate a new Octokit client with the user's token
  const octokit = new GitHubAPI()
  octokit.authenticate({ type: 'token', token })

  try {
    // If this doesn't throw, they can see the repo
    await octokit.repos.get({ owner, repo })
    return true
  } catch (err) {
    // It threw an error so they can't see the repo
    return false
  }
}
Last but not least, we need to create a page that will actually display this information. Just like with any web app, there are a million ways you could do this - I'm a fan of a templating language called Nunjucks for server-renderable things like this, but there really aren't any restrictions.
Ultimately, once you get the hang of extracting Probot's Express server, you're building a web app. The possibilities are endless! I can write about practical applications for this concept for a long time - if you're interested in hearing more, let me know!